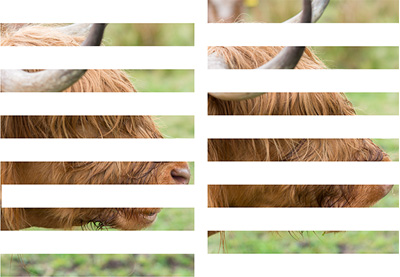
Time-lapse videos are a fantastic way to capture and examine the changing world around you with a new perspective. Whether you're examining the growth of plants or the passage of stars and planets, capturing their changes over time and speeding them up can give you a whole new perspective on these events.
The Raspberry Pi and it's
camera module make for an inexpensive and ideal solution for creating
high resolution time-lapse videos. In this tutorial you'll learn a
simple way to set up your Raspberry Pi and camera to record a
time-lapse video.
Gather the Components
- Raspberry Pi—Model B with power supply and SD card
- Raspberry Pi Camera Module or Raspberry Pi NoIR camera Module
- Network cable to your local network switch for copying the images off the Pi
- Raspberry Pi Camera Case
Choose a Camera
The standard camera module for the Pi, like most all digital cameras, is very sensitive to infrared light. To compensate, standard cameras have an IR filter inserted in order to filter out the IR light and capture more of the visible light spectrum. This filtering allows for capture of images in normal lighting conditions.
The Pi NoIR camera has the IR filter removed which allows it to capture more of the IR light. This can be used to capture low light or night images using IR illumination. Plant health can be measured as well by analyzing them in the infrared spectrum.
Consider the options of the standard Pi camera or the NoIR camera and select the right one for your project.
Set Up the Pi Platform
Set up and assemble the basic Pi components with the following steps.
- Burn the latest Raspbian image to the SD Card following instructions in the How to Flash an SD Card for Raspberry Pi tutorial
- Plug a USB mouse/keyboard into the USB ports
- Plug in the HDMI monitor to the HDMI port
- Attach the camera following the Pi camera instructions from raspberrypi.org
- Plug the Ethernet cable into the Pi
- Plug the power into the Pi
Configure Pi and Enable Camera Support
Upon boot, the Pi will run through the first boot setup of raspi-config. There are a lot of options regarding SD card
partition, region, keyboard, etc that are not covered here. Select the
options appropriate for your set up and pay special note to the
following options:
- Select Enable Boot to Desktop/Scratch > Desktop Log in as user 'pi' at the graphical desktop
- Select the Enable Camera menu item and enable the option
- Select the Advanced Options->SSH to enable copying the finished video off of the Pi
- Select finish and allow the Pi to reboot
- Record the IP address the Pi reports when it boots. This address will be used to SSH into the Pi for later setup steps and to compose and copy the video off of the Pi
- Login to the pi
- Install the
mencoderandscreenpackages with the command:
sudo apt-get install mencoder screen
- Gracefully shut down the Pi with the command:
sudo shutdown -h now
Setup the Camera Platform
Depending on what you wish to film, you will want to assemble an appropriate camera mount. This tutorial uses a simple setup to record footage indoors. Once you've tried this basic example you can begin to explore other ways to enclose and position the Pi and camera.
- Insert the camera into the camera case per the included instructions. It will simply snap together
- Screw or tape the camera case onto a solid stable surface such as a block of wood. This should allow you to position and angle the camera
Position the Pi and Camera
The next step is to aim the camera at your subject.
- Move the Pi, camera, keyboard, and monitor to the location you will be filming
- Connect power to the Pi
- Login to the console
- Snap a picture with the camera and aim the camera. The command to take the picture is
raspistill -o test.jpgThe raspistill command will put a preview video on the monitor before the picture is taken. You can use this to aim your camera precisely
Start the Recording
The recording process captures individual still pictures every time period and stores them in a directory. The command used below will rely on the time-lapse option in the raspistill program. The command will activate the camera module during the whole duration of the time-lapse recording dropping incrementally named image files into a directory.
The red indicator light glows when the camera is on. If the light causes reflection from glass or a container you may consider a small strip of electrical tape over the indicator. Execute the command below to create the picture directory and start recording pictures.
1 2 3 4 5 | cd ~mkdir picturecd picturescreenraspistill -o a%04d.jpg -t 21600000 -tl 30000 |
The screen command creates a virtual console that will continue to run even if you disconnect the monitor and keyboard while the recording takes place. The running commands will continue to execute in the background.
The nohup command could be used here, but for more advanced use screen will
allow reconnecting to the virtual console. You can remove the
keyboard and monitor if you wish during the recording.
The options on the raspistill command line are worth understanding so you can tailor the command to your purposes.
The -o sets the name of the file that will be output. The %04 indicates
that the image will get a four digit number incrementally assigned to
this part of the file name. For example: a0001.jpg, a0002.jpg, a0003.jpg, you get the idea.
The -t sets the duration of the
entire recording session in milliseconds. The command you used
will run for 21600000 milliseconds or six hours.
The -tl option indicates how
long to wait between each picture in milliseconds. The command you
used will take a frame every 30000 milliseconds or 30 seconds.
After six hours has elapsed, the command will simply exit back to the command prompt.
Compile the Video
Once the raspistill command
completes you will have a directory full of pictures that represent the
individual frames of your video. The next commands will compile
all the frames into an AVI video. Execute the commands below from
the console of your Pi
1 2 3 | cd ~/picturesls *.jpg > stills.txtmencoder -nosound -ovc lavc -lavcopts vcodec=mpeg4:aspect=16/9:vbitrate=8000000 -vf scale=1920:1080 -o timelapse.avi -mf type=jpeg:fps=24 mf://@stills.txt |
The command line option type=jpeg:fps=24
sets the frames per second to be 24. Following the math that each
frame represents 30 seconds of real time and 24 frames represent one
second of video time.
The real time represented by each second of video is 24 x 30s or 12 minutes, exactly one fifth of an hour. Five seconds of video represents one hour of real time. The command above will then generate a 30 second video covering 6 hours.
Between the command line options for raspistill and the options for mencoder you will be able to adjust the video time to real time ratio.
After the mencoder command completes there will be a timelapse.avi file in the pictures directory.
Retrieve the Video
Use an SCP program or command to copy the timelapse.avi
file from the Pi to your computer. The command below is an
example of copying it from a Pi at the example address at 192.168.1.100.
1 | scp pi@192.168.1.100:/home/pi/pictures/timelapse.avi . |
Enjoy your video!
Time-lapse Video
Summary
In this tutorial I have shown you how to set up a Raspberry Pi to record time-lapse video. The process is very simple and there are a lot of variations to how to use this technology.
With these basic skills you could experiment with weather tight containers and battery packs to set up an outside nature watching configuration. The Pi NoIR camera module presents some exciting possibilities as well to capture 24 hour long videos.

Tuts+ tutorials are translated into other languages by our community members—you can be involved too!
Translate this post Ben is a co-founder of Bluelock.com
and gets to invent cool new cloud computing services during his day
job. For entertainment he explores hobby electronics and all things
blinky and technical. He blogs about his adventures at locgt.blogspot.com. With a background in education and technology he enjoys any chance to share what he has learned.
Ben is a co-founder of Bluelock.com
and gets to invent cool new cloud computing services during his day
job. For entertainment he explores hobby electronics and all things
blinky and technical. He blogs about his adventures at locgt.blogspot.com. With a background in education and technology he enjoys any chance to share what he has learned.